


Entries in creativity (14)

Palo Alto Clay & Glass Festival
If you're looking for something fun/interesting/delightful to do today (Saturday) and/or Sunday, consider the annual Palo Alto Clay and Glass Festival. Not just any old summer street fair. Much, much more art condensed into one lovely, mostly-shaded, location.
In search of food? You'll find few vendors. Eat before or after. Then enjoy the winding walk through Rinconada Park in Palo Alto.
This is one of my top two Bay Area favorites.

http://www.acga.net/cgi-bin/DJcalendar.cgi?TEMPLATE=shows-detail.html&EVENTNO=00065
What's not to love?
I adore these crazy/wildly wonderful women!
Thank you, Judi.
H E L P ! ! !
I've apparently fallen into a Very Large Land Art hole and cannot get out!
What better way to spend a rainy day?
Headshakingly magnificent.
Be sure to see the second in the series.
Phenomenal.
Linda's dinky babies!!!
 What could be cuter?
These were too terrific!!!! Click for link to patterns possibilities.
No time left this year to sew these BUT JUST WAIT UNTIL NEXT YEAR!!! They're at the top of my list. Love them.
Thanks so much for sharing, Linda!!!
Do you sleep?

Felting follow up
 OK, I did a little video using my new iPhone duct taped to a ladder/hmmmmm. How to deal with volume settings, etc. and ability to edit? Well, as you might have noticed, these were not the only issues I have to deal with. But I wanted to get the info out to those of you who were with me Wednesday. The rest of you will just have to hold your breath. Maybe I'll be brave enough to post it here. OMG. Not.
Felting could not be easier!!!
Particularly with the device below/as opposed to single poking device featured on Martha video from a few days ago.
Here are the basics: Shop your closet or used clothing store for wool sweaters. Wash in hot water; dry in hot drier. Cut along seams. Lay out pattern so that arms of new sweater align with arms of old washed one. Cut & sew.
Then the fun begins. Will share finished product ASAP assuming it actually gets finished.


Adele Enersen again.
 You may have seen her work here this past January. Today I found some additional images. In my excitement, I may have snagged some duplicates. I'll bet you won't mind seeing her art again. And again and again... Each time I watch, I find something I hadn't noticed before.
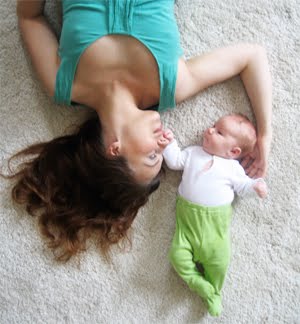
In her own words: "I used to introduce myself as a copywriter & concept designer in advertising, but that's not that relevant anymore. Right now I am a mother and a housewife, and loving it!
While my baby is taking her nap, I create scene around her and take quick snap photos. I use only few minutes per picture, including creating idea, implementation and editing, 'cause I don't want to disturb her sleeping and most of my time is for my family. My camera is small and inexpensive Canon IXUS 750."
Adele Enersen, you are truly an amazingly creative woman and mom!!! Congratulations!!!
Mila's Mom is AAAAAAAH-MAZING!
Meet the Mom behind 'Mila's Daydreams'
If you missed the initial entry about this incredibly creative mom, see: Truly Totally Terrific.
Also see this interview: http://www.youtube.com/watch?v=uYI3tg3vmuA&feature=related
WOW! What a woman! Were you ever this creative during your postpartem days?
Much as I love her work, Move on over, Anne Geddes!
TRULY, TOTALLY BRILLIANT!!!
Phenomenal, really. Here is the Truly Amazing work of Adele Enersen from Helsinki, Finland. What follows is her maternity leave project. While her daughter is soundly asleep, she creates a completely different world from whatever she can find around her!
So incredibly brilliant/creative. She has quite a stash of wonderful things in her world. Almost makes me want another child! Almost. Thanks, Joan, for sending this my way.
Recycle. Reuse. Revitalize.
What to do with the jewelry you never ever wear? Pieces you’ve been given that have a few elements you'd like to isolate and extract? Something you once loved but is now a tad tired?
Revitalize your collection by pulling everything out of their hiding places. Evaluate what stays and what goes. Isolate all that could be resurrected or reworked. Then begin playing with what’s left.
 Gather together a group to share/rework/recycle. Or simply enjoy the experience by yourself. A little elastic, some beads. Reformat tired jewelry into something you’re more apt to wear and enjoy.
My pieces are simple/colorful/easy to make. Effortless to disassemble and rework. The other critical component: I'm a fan of instant results. Fast and fun.
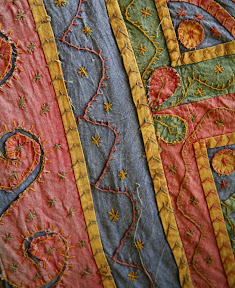
Where to start? "Borrow” color stories from whatever's in your immediate environment: Multicolored carpets/fabrics, scarves, nature, art. Something you already love.
I'll often try to keep the relative color proportions consistent, i.e., more peach than blue or green. A hint of yellow.

Create a bracelet to match existing earrings or to complement a favorite necklace. Super simple. And very satisfying.
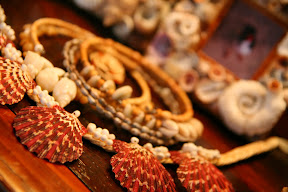
Left: Seaweed-style necklace I purchased years ago but was never worn. I recently found beads that resembled it. Then tea-dyed the macramé belt from its original far-too-bright white to a much more mellow almost-yellow. Loved the result.
Other things to consider? How to hide the knot: Plan ahead. Tie the elastic next to a bead with a hole large enough to accommodate the knot.

Remember, nothing’s cast in stone. If you don’t like it, cut the elastic and begin again.
Right: Earrings and belts are, for me, better store bought. Bracelets, a total cinch to tackle myself.

It’s not just “a good thing.”
It can be a pretty great thing to experience together with friends. Or by yourself. A moment of quiet creativity.
 Lois
Lois
Now having gone on Facebook/why am I doing this?/I find another friend with cancer. Damn. Why can’t we figure out how to deal with this often-deadly/definitely debilitating disease? I’m not only sad and disheartened but thinking what I just wrote is totally inane/off the mark/superfluous. Who really cares about making jewelry when a friend is facing cancer? If I totally immersed myself in all the sadness of the world I know, I’d have trouble resurfacing. And enjoying the simple pleasures. I hope that what I’m writing about focuses on the simple and very possible pleasures that take little money and time. Pleasures that bring people together to enjoy each other. Just as we’ve all done this past week.
To everyone who was here with me, thank you. What a wonderful time together. I love all of you.
Lois
Thank you, dear friend, Barb.
Lo,
Please don't beat yourself up re:jewelry fixin' vs friends in trouble. I totally and completely understand your pain at finding another person you care about struggling.......totally appropriate; however, we ALL love to 'play' with beautiful items; jewelry, flowers, odd finds here and there, FRIENDS. And these are the very activities that help struggling people to keep up the good fight. A day with a buddy making new baubles would be a day of sunshine and escape from worry/pain. So, you are actually being THERAPEUTIC, and not irrelevant.
Lois
Thanks to another dear friend!
Loved the blog today...
It's so true that you can't control a lot of the bad stuff in life, but you can make each day prettier, more fun, more meaningful.
As that card I gave you said,
"Life is what you make it, always has been, always will be."
Secret Source Revealed: Stamps
Trying to be entirely paperless? Perfect. Me, too. Far less impact on the environment/unparalleled speed of delivery.
But there are times when USPS is essential. Handwritten notes are just one very much appreciated example.
In which case, you're going to need a stamp.
My top pick, either as a gift for someone else or to use yourself: Zazzle personalized postage. I've tried others but continue to choose this company. I like the print quality, color saturation, quick turnaround time and variety of stamp sizes.  And I typically order the largest version that they offer simply because it's a beautiful addition to the envelope. Not for bills but for someone who would appreciate the extra effort. Great birth/or other event announcement. And a cinch to do just by uploading your pictures.
ADDITIONAL CONCEPT: If you live in the SF Bay Area, you're no doubt familiar with FLAX, an extraordinary art supply store. Their stock of paper products is pretty unparalleled/let me know if you have a better resource. I was shopping for A-7 (5.25" X 7.25") envelopes and cardstock to mount my own pictures.
Then I found translucent envelopes.  Very cool to use for mailing something special, like a photograph or your own photo stationery. FLAX's price was substantially higher than other online sources I subsequently found. So, if interested, Google "translucent envelopes" for a good deal. I ordered some today from envelopemall.com. You may find a better source/value. Let me know.
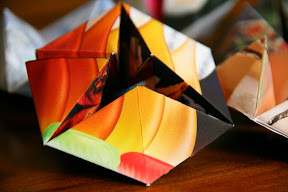
Your own original origami
Periodically I have the privilege of spending time with my friend, Anne. We’re talking about a woman with an amazing amount of energy, a skill set that is both broad and deep and ideas that simply won’t stop. This past week we had a few days to catch up with each other. Here’s just one of the many clever projects/resources she shared with me: How to make your own photo kaleidocycle.
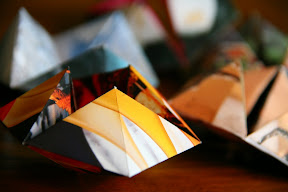
What I learned from Anne:
- The first few kaleidocycles can be a bit frustrating. Don't give up/the results are worth it.
- Choose digital images that have the point of interest in the center of the photo. The program does some random cropping.
- Print two copies of your first kaleidocycle. When you "cut on the black lines,” you will also cut away the instructions! The second copy will preserve that information.
- Use rubber cement or school-type glue. It needs to be fairly fast drying, but not "instant." Don’t use double stick tape/the parts need to "slide" a bit before setting and two-sided tape will grab the pieces too soon.
- Important hint: Do not use rubber cement near your computer!
- There is a short video on the site that will give you the confidence you need to press through to completion. It may take a few tries before you reach perfection!
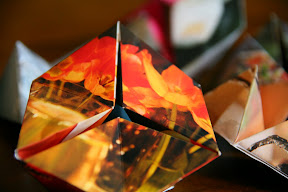
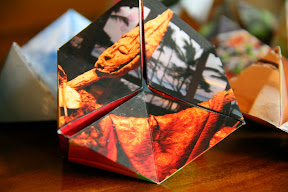
Have fun folding, friends! Just click here to access the website: foldplay
Periodically I have the privilege of spending time with my friend, Anne. We’re talking about a woman with an amazing amount of energy, a skill set that is both broad and deep and ideas that simply won’t stop. This past week we had a few days to catch up with each other. Here’s just one of many clever projects/resources she shared with me: How to make a photo kaleidocycle.
Tips from Anne:
- The first few kaleidocycles could be a little frustrating and sort of difficult. Don't quit.
- Choose photos that have the main interest at then center of the photo. The program does do some random cropping.
- Print two copies of your first kaleidocycle. When you "cut on the black lines,” you will cut away the instructions! The second copy will preserve the instructions for you to follow.
- Use rubber cement or school adhesive. It needs to be fairly fast drying, but not "instant," glue. Don’t use double stick tape. The pieces need to "slide" a bit before setting and the tape will grab the pieces too soon.
- Important hint: Don't use rubber cement near your computer!
- There is a short video on the site that will give you confidence that on your 3rd and 4th try, it will be easier.
Less Is Much, Much More
You’re no doubt familiar with this old adage: In crisis there is potential opportunity. When the tsunami warnings sounded, I cleared my closet of everything that had been collected with Hawaii in mind.
Once home I began the sometimes-tedious/mostly-terrific practice of putting together what I termed, "accessory packets." Why? Simply so that I could be much more organized when I returned. My goal: far less stuff/far more thoughtfully constructed combinations. The process was so enlightening and so incredibly satisfying that I’ve decided to sound the alarm at home as well.
 I began by asking myself what components typically define an outfit. This meant a handful of the following: necklace, earrings, bracelet, scarf/for waist or shoulders and shoes. Possibly a purse. Occasionally a belt.
What I’m about to describe will sound silly/like total overkill/to some. But for me, the following system simply makes sense. Here’s why:
Since I almost always try to squeeze as much as possible into a day, I’m inevitably on the brink of running late. With my/your pre-packaged AP in hand, getting dressed and out the door is a cinch. You simply superimpose your accessories over a column of color (black or white/I’m currently loving leggings and leotards as a base) and you're ready to go.
Another benefit? Packing for travel becomes a Total No Brainer. Accessory packs can be stuffed into colossal/oversize Ziplocks and stored until worn. Or, as on a recent trip, I left the bags in my suitcase simply b/c there was no place to unpack. When I was searching for a particular item, the giant Ziplocks glided effortlessly across each other so I stayed organized for days, which was pretty remarkable. I was one happy camper.
You can place your AP, as I often do, on a hanger. Or pack it all in a purse.
Organza drawstring bags help corral components. Search online for these handy holders that could, if it makes sense for you, accommodate shoes as well as the other pieces. My top two picks: 6 X 9 and 6 X 15. Alternatively, an attached, punched picture helps track pieces that go with multiple outfits/jewelry, shoes, belt.
Where to start? Spread your stuff out on a table. Begin the process of partnering, starting with a favorite scarf, earring or shoe/sandal…
You’ll quickly discover One More Big Benefit: Those items that need to be discarded, disassembled, shared with someone else or donated will be left standing alone once you’ve assembled your packets. You’ll also find “orphans” that simply need other “family members” to become fully functional components of your closet. Choose carefully/purge regularly.
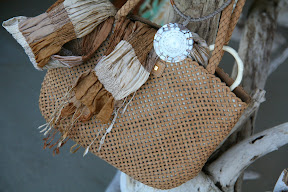
Final recommendation: Be a savvy shopper. No need for Neiman Marcus when you can find far more interesting, hand-crafted treasures from your travels around town or elsewhere in the world. Favorites: Local farmer's/craft markets and Cost Plus finds/shown below.

Dinner deadlines are no longer an dilemma. I can be ready to go in two seconds flat. Time me tonight!
Lois
Truth is/on vacation this past week/I've worn precisely the same thing every evening to dinner. It's so much easier to pick up and put on what's already on the counter rather than opening the closet.
AND, I have to say, that it's tremendous fun when there's time, to mix it up a bit.
I'm enjoying both ends of the spectrum. No need to obsess about one end or the other.