


Sunday
Apr112010
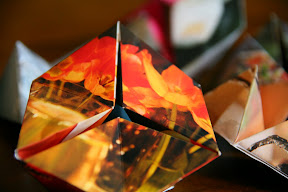
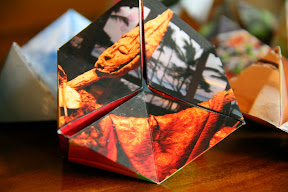
Your own original origami
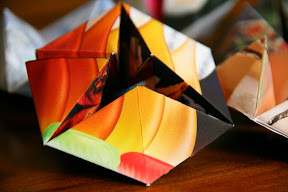
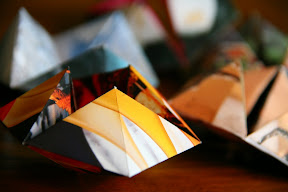
Periodically I have the privilege of spending time with my friend, Anne. We’re talking about a woman with an amazing amount of energy, a skill set that is both broad and deep and ideas that simply won’t stop. This past week we had a few days to catch up with each other. Here’s just one of the many clever projects/resources she shared with me: How to make your own photo kaleidocycle.
What I learned from Anne:
- The first few kaleidocycles can be a bit frustrating. Don't give up/the results are worth it.
- Choose digital images that have the point of interest in the center of the photo. The program does some random cropping.
- Print two copies of your first kaleidocycle. When you "cut on the black lines,” you will also cut away the instructions! The second copy will preserve that information.
- Use rubber cement or school-type glue. It needs to be fairly fast drying, but not "instant." Don’t use double stick tape/the parts need to "slide" a bit before setting and two-sided tape will grab the pieces too soon.
- Important hint: Do not use rubber cement near your computer!
- There is a short video on the site that will give you the confidence you need to press through to completion. It may take a few tries before you reach perfection!
Have fun folding, friends! Just click here to access the website: foldplay
Periodically I have the privilege of spending time with my friend, Anne. We’re talking about a woman with an amazing amount of energy, a skill set that is both broad and deep and ideas that simply won’t stop. This past week we had a few days to catch up with each other. Here’s just one of many clever projects/resources she shared with me: How to make a photo kaleidocycle.
Tips from Anne:
- The first few kaleidocycles could be a little frustrating and sort of difficult. Don't quit.
- Choose photos that have the main interest at then center of the photo. The program does do some random cropping.
- Print two copies of your first kaleidocycle. When you "cut on the black lines,” you will cut away the instructions! The second copy will preserve the instructions for you to follow.
- Use rubber cement or school adhesive. It needs to be fairly fast drying, but not "instant," glue. Don’t use double stick tape. The pieces need to "slide" a bit before setting and the tape will grab the pieces too soon.
- Important hint: Don't use rubber cement near your computer!
- There is a short video on the site that will give you confidence that on your 3rd and 4th try, it will be easier.
 Lois
Lois
Reader Comments